vnote_backup_file_826537664 /home/mi/Documents/backup/VnoteBook/OTA相关/动态分区机型fastbootd使用.md
动态分区机型fastbootd使用
fastbootd简介
在动态分区机型上bootloader的fastboot不能烧写动态分区的镜像, 需要使用recovery子系统下的fastbootd来进行用户空间的烧写镜像的工作
fastbootd是recovery子系统下的一个native进程, 由init fork出来. 具体实现方式类似于adbd.
包括进程创建, 驱动通道, 与init的协作都与adbd一致, 是属于借助usb的config配置实现的功能.
因此不能同时启用adb和fastboot模式, 因为这两个独占同一个通道.
fastbootd命令
| Command | Description | Available when device is OEM locked |
|---|---|---|
| getvar is-userspace | Return yes | Yes |
| getvar is-logical: |
Return yes if the given partition is a logical partition, no otherwise |
Yes |
| getvar super-partition-name | MUST return super for a device launching with logical partitions |
Yes |
| create-logical-partition |
Create a logical partition with the given name and size |
No |
| delete-logical-partition |
Delete the given logical partition | No |
| resize-logical-partition |
Resize the logical partition to the new size without changing its contents |
No |
| update-super |
Similar to flash super, except rather than flashing raw data to the super partition, this will ensure that all partitions within the downloaded image are created |
No |
| getvar max-download-size | Return the maximum size of an image that can be downloaded in bytes in hex |
Yes |
| getvar partition-type |
Return file system type: ext4, f2fs, raw |
Yes |
| flash partition_name filename | Flash the partition through a series of download and flash fastboot protocol commands |
No |
| reboot bootloader | Reboot into bootloader mode | Yes |
| reboot fastboot | Reboot back into fastbootd mode | Yes |
安装最新的fastboot工具
在platform-tools获取最新的fastboot和adb的工具
- linux下替换
解压后得到platform-tools 目录
1 | export $PATH=<platform-tools目录>:$PATH |
- windows下替换
打开资源管理器explorer, 右键此电脑 -> 属性 -> 高级系统设置 -> 环境变量 -> 用户变量 ->Path下添加解压platform-tools的目录
注销, 重新登录生效.
fastboot devices查看是否有设备号输出, 如果没有, 需要配置端口或更新驱动
win下, 通过设备管理器 -> 其他设备 (未识别的!设备)-> 右键更新驱动 -> 自动搜索驱动
linux下, lsusb 设备号, 将识别出的设备号按照adb 配置设备的方式进行配置, 这里不再赘述
从super img分离出包含的动态分区
转换super img为原始镜像
动态分区线刷包中是super.img,格式是sparse image,要查看super.img首先需要使用simg2img进行转化。若转化后为super_ext4.
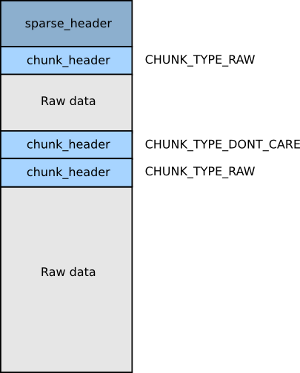
Android Sparse Image
为了缩小镜像大小,Android会以稀疏格式生成system.img,vendor.img userdata.img和cache.img。镜像被拆分为4K字节倍数的块。
任何不包含有用数据的块都将标记为Don't Care
1 | system/core/libsparse/simg_dump.py -v cache.img |
1 | simg2img ~/Downloads/umi_images_1.2.2_20191021.0000.00_10.0_cn/images/super.img ~/Downloads/umi_images_1.2.2_20191021.0000.00_10.0_cn/images/super.img_ext4 |
dump super img
如果需要查看super.img里包含哪些img, 其格式是怎样的, 可以使用lpdump工具
1 | ] -> ./lpdump ~/Downloads/umi_images_1.2.2_20191021.0000.00_10.0_cn/images/super.img_ext4 |
如果需要从super.img中解出其包含的分区镜像, 可以使用lpunpack工具
- lpunpack [-p partition_name] SUPER_IMAGE [OUTPPUT_DIR], -p后面跟要取出的分区名,若不指定,都会取出*
解出system.img
1 | ./lpunpack -p system ~/Downloads/umi_images_1.2.2_20191021.0000.00_10.0_cn/images/super.img_ext4 unpack |
解出的system.img即为原始的带文件系统的镜像, 可以直接挂载
1 | 查看system.img镜像的文件系统类型 |
如上提到的工具
可以直接在打开动态分区的机型上编译对应的工具
1 | make simg2img lpdump lpunpack |
也可以直接下载我这里编译好的(64位的)